

A perfect print job has less to do with your design skills and everything to do with how you handle the physics of a moving blade. Even the most striking layout becomes a liability when it lacks a proper bleed for print, leading to rejected files or unprofessional white borders that ruin a high-stakes delivery. In a deadline-driven environment, you cannot afford the delays caused by technical oversights in your document setup. We understand that when you are operating under pressure, you need your files to work the first time.
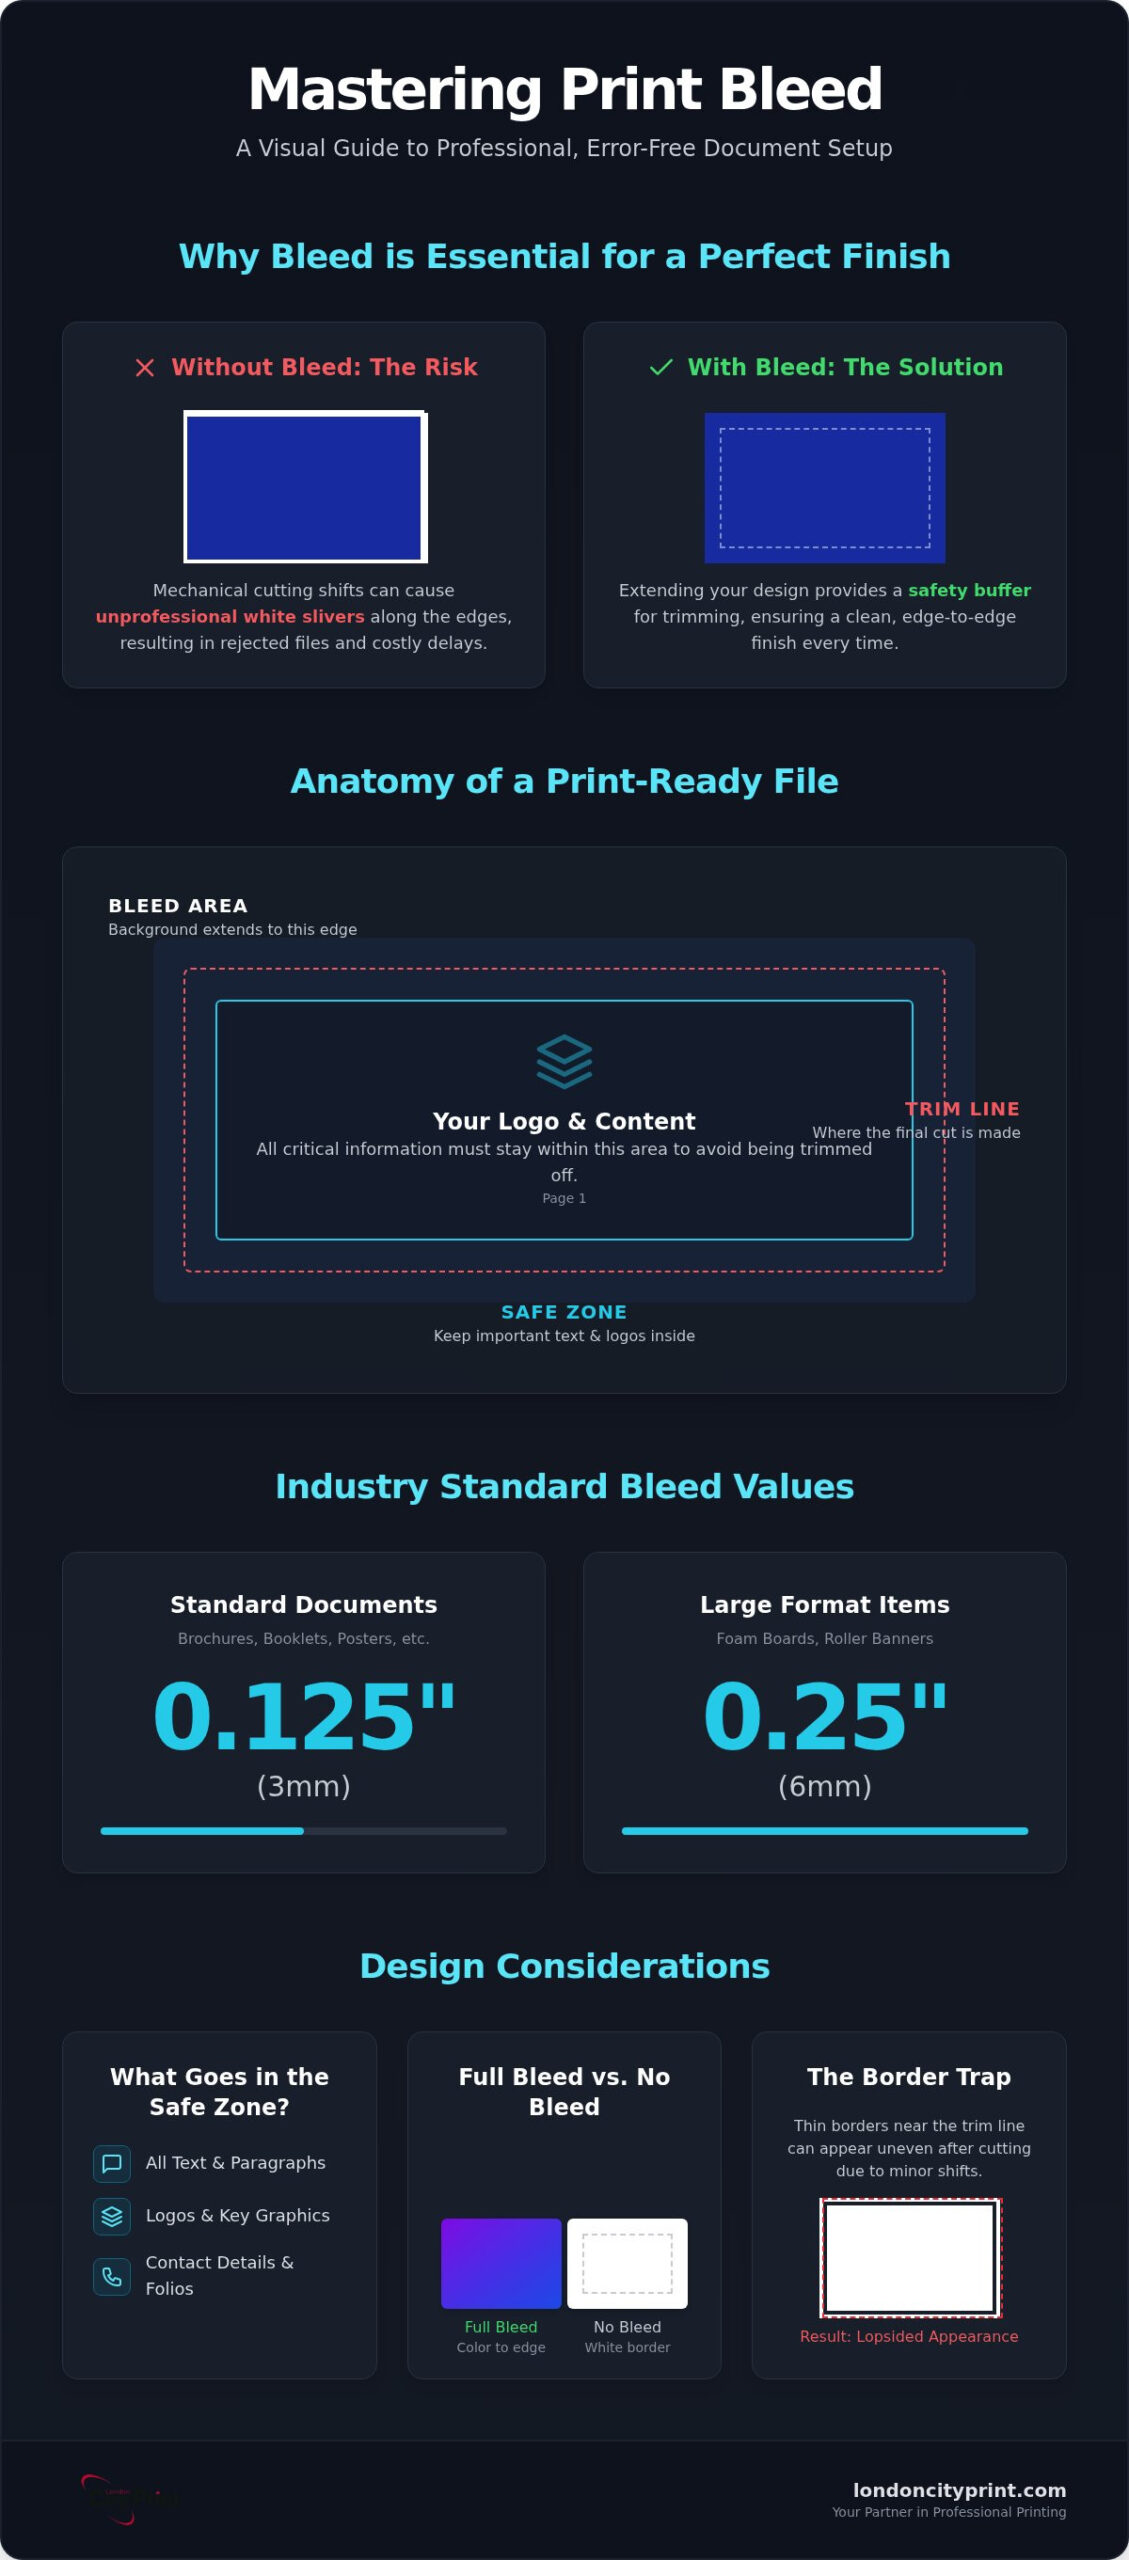
It is frustrating to see critical text cut off or find that your brand colors do not extend to the very edge of the page. This guide provides the technical clarity you need to master print specifications, ensuring your booklets, brochures, and posters are produced with absolute precision. We will detail the 0.125-inch industry standard for standard documents and the 0.25-inch requirement for large format items like foam boards or roller banners. These values remain the essential benchmarks for professional production as of August 2026.
By the end of this guide, you will have a clear understanding of the mechanical necessity of bleed, trim, and safe zones. We will also walk through the specific settings for Adobe InDesign and Illustrator to ensure your files meet the rigorous standards of commercial production. You can move forward with the confidence that your next project will be print-ready and perfect on the first run.
Key Takeaways
- Understand how a proper bleed for print compensates for mechanical trimming variations to prevent unprofessional white edges on your finished documents.
- Learn to define the three critical zones-bleed, trim, and safe margins-to ensure your design layout remains intact and professional after the final cut.
- Gain technical insights into configuring professional software settings to automate bleed requirements during the initial document creation phase.
- Identify specialized bleed considerations for various commercial products, including the high precision needed for business cards and the unique requirements of multi-page brochures.
- Discover how expert pre-flight protocols can eliminate technical errors and facilitate the rapid turnaround required for time-sensitive corporate projects.
What is Print Bleed and Why is it Necessary?
In professional commercial production, bleed is defined as the area of your design that extends past the final trim dimensions. It acts as a safety buffer for the finishing process. When you incorporate a bleed for print, you are acknowledging the physical realities of high-speed manufacturing. Despite the advanced technology used in modern digital presses, no commercial guillotine can cut with 100% molecular precision across a thousand-page run. Mechanical tolerances are an inherent part of the process; bleed is the technical solution that ensures your finished product looks exactly as intended.
The primary reason for this requirement is the occurrence of white gaps or slivers along the edges of a document. These gaps appear when the cutting blade misses the intended trim line by even a fraction of a millimeter. If your design stops exactly at the edge, any slight deviation reveals the unprinted white paper underneath. This results in a finished product that looks amateurish and poorly executed. For corporate clients operating under tight deadlines, such errors can lead to rejected files and costly delays that disrupt distribution schedules.
The Physics of the Printing Press
Understanding why bleed is necessary requires a look at the physics of the press. High-speed digital printers use mechanical components to “grip” and pull paper through the machine at high velocities. This rapid movement causes what industry professionals call “paper bounce.” As the sheets travel through the rollers, they can shift slightly. Because of this movement, it’s physically impossible to print directly to the edge of a final-sized sheet. Instead, we print your artwork on oversized paper stock. This allows the ink to extend beyond the final dimensions, providing the necessary coverage even if the paper shifts during the run. This methodical approach is what allows us to maintain the high standards required for legal bundles and technical documentation.
Full Bleed vs. No Bleed Designs
A full-bleed design is one where the background color, images, or graphic elements reach the very edge of the page. This creates a sophisticated, professional aesthetic that is essential for high-quality booklets and brochures. While you can safely ignore bleed for designs with a solid white background, it’s a critical requirement for any layout with edge-to-edge color. You should be especially cautious with borders placed near the trim line. These are the most difficult elements to print accurately because even a minor shift makes the border look lopsided or uneven. For a deeper technical overview of these zones, you can consult the entry on Bleed (printing) on Wikipedia. Mastering your bleed for print ensures that your vision translates perfectly from the screen to the finished physical product without last-minute complications.
Defining the Three Critical Zones: Bleed, Trim, and Safe Margins
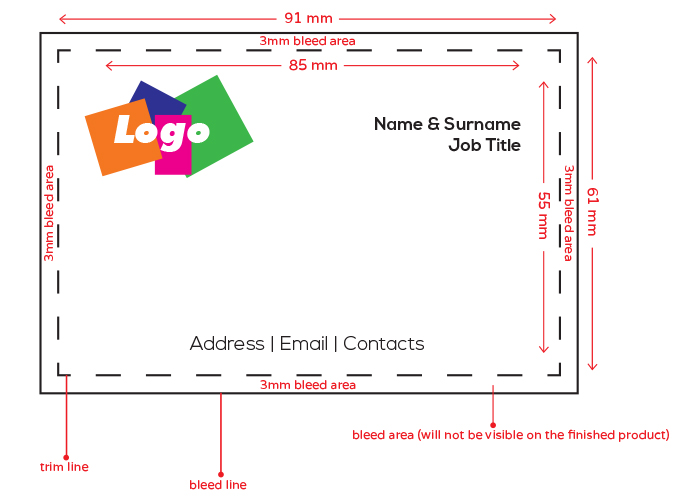
To produce a flawless document, you must visualize your digital file as a three-layered sandwich. Each layer serves a specific mechanical purpose in the journey from screen to finished product. The trim line represents the final dimensions of your project, such as a standard A4 sheet or a bespoke business card. The bleed zone is the external buffer, while the safe zone is the internal margin. Mastering the relationship between these three areas is the most effective way to prepare a professional bleed for print.
- Trim Line: This is where the guillotine blade falls. It defines the physical boundary of your finished work.
- Bleed Zone: This area extends past the trim line to account for minor mechanical shifts during production.
- Safe Zone (Quiet Area): This is the inner margin where all essential elements, like logos and contact details, must reside to avoid being cut or appearing cramped.
Calculating Your Document Size with Bleed
While many online resources rely on imperial measurements, the UK commercial industry operates on a 3mm metric standard. This level of precision is vital for high-stakes projects like corporate brochures or wedding stationery. If you are designing an A4 document (210 x 297mm), your canvas size with bleed must be 216 x 303mm. This provides exactly 3mm of coverage on all four sides. If you are unsure of your software settings, Adobe provides a detailed guide on how to set up bleed in Adobe InDesign to automate this calculation. Getting these dimensions right at the start prevents the need for manual resizing later, which often causes resolution loss and delays.
The Safe Zone: Protecting Your Content
The safe zone is just as critical as the bleed. Text that sits too close to the edge looks cluttered and risks being partially trimmed. For standard business cards, we recommend a 5mm internal margin. However, larger projects like posters or foam board printing can accommodate wider margins for a cleaner look. Special care is required for wire binding and legal bundle printing. These products need an even larger safe zone on the binding edge to ensure text isn’t lost in the punched holes or the coil. If you’re operating under a tight deadline, our team at London City Print can perform a pre-flight check to ensure your bleed for print and internal margins are safe before we hit the press.
Technical Setup: How to Add Bleed in Professional Software
Setting up your document correctly from the start is the most effective way to ensure a seamless production cycle. When you define your bleed for print during the initial document creation phase, you eliminate the risk of having to manually adjust hundreds of elements later. In professional suites like Adobe Creative Cloud, the software provides a dedicated field for these dimensions. While the “Slug” area is intended for internal printer notes or job information, the “Bleed” field is what dictates the actual extension of your artwork. Always ensure you are using the UK industry standard of 3mm on all four edges to maintain consistency across your brochures and flyers.
Adobe InDesign and Illustrator Workflow
In Adobe InDesign or Illustrator, navigate to File > Document Setup and expand the Bleed and Slug section. Enter 3mm into the top field and click the link icon to apply it to all sides. This creates a visible red line outside your white page border. It’s a common mistake to set the bleed in the settings but fail to extend the artwork. You must manually stretch every background image, shape, and color block until it snaps to that red line. Use the “Bleed” preview mode to verify that no white slivers remain in the workspace before you proceed to the export stage. This methodical check is a standard part of our own pre-flight process for corporate clients.
Bleed for Non-Designers: Canva and Microsoft Word
For professionals using Canva, you must enable the “Show print bleed” option under the File menu. This reveals a dashed border; you must then manually stretch your design elements to fill this extra space. Microsoft Word does not have a native bleed function, so the most reliable workaround is to create a custom page size. For an A4 document, set your page dimensions to 216mm x 303mm. This provides the necessary 3mm buffer on every side. Regardless of the software used, converting your final design to a high-quality PDF is essential for maintaining these technical specifications. This ensures your bleed for print remains intact during the transfer to our production team.
The final step is exporting your file as a print-ready PDF. In the export dialogue, navigate to the “Marks and Bleeds” tab. You must check the boxes for “Crop Marks” and “Use Document Bleed Settings.” This ensures the printer knows exactly where the trim line sits in relation to your extended artwork. Providing a file with these settings correctly applied is the single most important factor in achieving the rapid turnaround times required for high-stakes projects like legal bundles or tender documents. It allows our team to move your project directly to the press without technical delays.
Bleed Requirements for Specific Products: From Business Cards to Posters
While the 3mm standard is a reliable baseline for most projects, specific product categories demand tailored adjustments to ensure a perfect finish. The required bleed for print fluctuates based on the scale of the item and the complexity of the finishing process. For small-format items like business cards, precision is paramount. Because the final trim size is compact, even a minor deviation of half a millimeter is immediately visible to the naked eye. We maintain a strict 3mm buffer on all business card orders to ensure that edge-to-edge colors remain consistent across the entire production run.
Large-format products require a different strategy. For items such as Posters, Roller Banners, and Foam Board Printing, we often recommend increasing the bleed to 5mm. This extra buffer accounts for the manual handling and mounting required for rigid substrates or oversized graphics. Vinyl Window Graphics also benefit from this wider margin. It ensures seamless coverage during installation, especially when the graphics must align with architectural frames or glass edges. This methodical approach to varying product scales is what allows us to deliver high-quality results for our corporate clients.
Special Considerations for Multi-Page Booklets
Designing for Professional Booklets and Brochures introduces the challenge of “creep.” As you add more pages to a saddle-stitched booklet, the thickness of the paper causes the inner pages to push further away from the spine than the outer pages. When the finished booklet is trimmed to its final size, the inner margins can appear smaller than intended. To compensate for this physical reality, you must ensure your safe zone is generous, typically at least 5mm to 10mm, while maintaining your standard 3mm bleed for print on the outer edges. This prevents text from getting too close to the trimmed edge as the page count increases. If you are planning a corporate brochure from scratch, our detailed guide on how to design and print an effective information brochure covers the full production workflow, including paper weights, binding types, and bleed margins.
CAD Plotting and Technical Legal Bundles
Technical documents follow a distinct set of rules. For CAD Plotting and Legal bundle printing, we often utilize a “no-bleed” approach. Architectural plans and technical drawings usually feature wide white margins to ensure that every line, scale, and dimension is clearly visible. In high-stakes legal documentation, it’s essential that indices and page numbers are not obscured by the wire binding or the trimming process. We recommend a safe zone of at least 15mm on the binding edge for these projects. This ensures your documentation remains fully functional and professional during court proceedings or site inspections. If you are managing a complex project with varying requirements, you can contact London City Print for a technical file review to confirm your specifications are press-ready.
Ensuring Same-Day Success: Professional File Checks and Corrections
In the high-pressure corporate environment of Central London, timing is the most critical variable. A minor technical oversight in your document setup can halt a production run and jeopardize a same-day delivery promise. Incorrect bleed for print remains the primary reason for file rejection in commercial hubs. When a document arrives without the necessary 3mm buffer, it requires manual intervention that consumes valuable time. Our role is to act as your technical partner, ensuring that your high-stakes tenders and legal bundles move through our systems without friction.
We provide a comprehensive pre-flight service to identify these errors before they reach the digital press. If our specialists detect a missing bleed, we don’t simply reject the file. Depending on the artwork, we can often employ technical “quick fixes” to save a deadline. We might “mirror” the pixels at the edge of your design to create a synthetic buffer or slightly scale the artwork to provide the necessary coverage. While these are emergency measures, they provide the safety net required when operating under extreme time constraints.
Meeting High-Stakes Deadlines in London
The relationship between file accuracy and production speed is direct. A truly “print-ready” file is one that can be processed by our automated cutting and finishing equipment immediately upon arrival. Our team understands that for legal professionals and corporate directors, a delay of even an hour can have significant logistical consequences. We take pride in our ability to facilitate last-minute adjustments, ensuring that even the most complex technical documentation meets our rigorous quality standards while staying on schedule.
Final Checklist Before Sending Your File
Before you transmit your final documents, perform this methodical check to ensure your bleed for print is correctly configured. These three steps are the most effective way to guarantee a successful first-time print run.
- Export Settings: Verify that your PDF is exported with a 3mm bleed on all sides and that “Crop Marks” are active.
- Image Extension: Ensure every background color, shape, and photograph is stretched past the trim line to the very edge of the bleed zone.
- Safe Margin Check: Confirm that all vital text, page numbers, and logos are positioned at least 5mm away from the trim line to avoid being cut or obscured.
Ready to print? Upload your print-ready files here for a professional review and ensure your project is delivered with the precision and speed your business requires.
Achieving Professional Precision in Every Print
Mastering the technical requirements of bleed for print is the final step in transitioning from a digital layout to a flawless physical product. By maintaining the 3mm standard and respecting safe margins, you eliminate the risk of unsightly white borders or lost content. These specifications are the mechanical foundations that allow for the high-speed, high-precision results your corporate projects demand. Don’t leave your deadline to chance when operating under pressure.
Operating from our Central London location, we provide the rapid support and reliability necessary for time-sensitive documentation. Our experienced reprographic technicians perform expert file-checks on every order, acting as a dependable safety net for your technical preparation. We offer same-day turnaround for booklets, posters, and legal bundles, ensuring your materials are ready exactly when you need them. We are committed to facilitating your success through technical mastery and responsive service.
Take the guesswork out of your production cycle and let our team handle the technical details. Get an Instant Quote for Your Professional Print Project today and move forward with the calm assurance that your files are in expert hands.
Frequently Asked Questions
What is the standard bleed size for printing in the UK?
The standard bleed size for commercial printing in the UK is 3mm on all four edges. This metric measurement is the industry benchmark for everything from business cards to brochures. It provides the necessary tolerance for the guillotine blade during the trimming process. While some international guides suggest 0.125 inches, you should always use 3mm for UK-based production to ensure absolute accuracy and avoid manual conversion errors.
Can I print a document without any bleed?
You can print without bleed only if your design features a solid white background that extends to every edge. If your layout includes background colors, images, or any graphic elements that touch the trim line, a bleed is mandatory. Printing a color-rich design without a proper bleed for print will almost certainly result in unprofessional white slivers along the edges due to minor paper shifts during high-speed production.
What happens if I forget to add bleed to my design?
Forgetting to add bleed usually results in your file being flagged during our pre-flight check, which can cause delays for time-sensitive projects. If the job proceeds without it, the finished product will likely have uneven white borders where the blade missed the intended trim line. In a professional business-to-business environment, these defects are often unacceptable and may require a complete reprint of the entire order to maintain your brand standards.
How is bleed different from the safe zone or margin?
Bleed is the area outside the trim line that gets cut off, while the safe zone is the internal margin where your vital content stays protected. The bleed exists specifically to account for the mechanical movement of the paper during the printing process. The safe zone ensures that your text and logos don’t look cramped or get partially trimmed if the blade shifts inward. Both zones are essential for a professional, balanced layout.
Do I need bleed for business cards if they have a white background?
Business cards with a purely white background don’t strictly require a bleed for the background itself. However, if your card includes a logo, a decorative line, or a photo that touches any edge, you must include a 3mm bleed. Even for cards with white backgrounds, we recommend maintaining a 5mm safe zone. This ensures your contact details remain centered and professional after the final mechanical cut is made.
How do I add bleed to a PDF that has already been created?
You cannot technically add bleed to a PDF after it’s created because the software needs the original image data to stretch into that extra space. The most reliable solution is to open your original design file in InDesign, Illustrator, or Canva and adjust the document setup. Once the artwork is extended to the new boundaries, you must re-export the file as a print-ready PDF with the bleed for print settings active.
Does large format printing like posters require more bleed?
Large format items like posters and foam board printing often require a larger 5mm bleed to account for more complex finishing processes. Because these items are often mounted or trimmed by hand, the extra 2mm of buffer provides a necessary safety net for the production team. For very large vinyl graphics or banners, we may even suggest up to 10mm to ensure a seamless installation on architectural surfaces or window frames.
Why are my crop marks not showing up on my exported PDF?
Crop marks usually fail to appear if you haven’t checked the “Crop Marks” box in the Marks and Bleeds section of your PDF export dialogue. Additionally, if you haven’t defined a bleed area in your document setup, the software might not have a reference point to place the marks. Always ensure both the “Crop Marks” and “Use Document Bleed Settings” boxes are selected during the final export to ensure your file is press-ready.